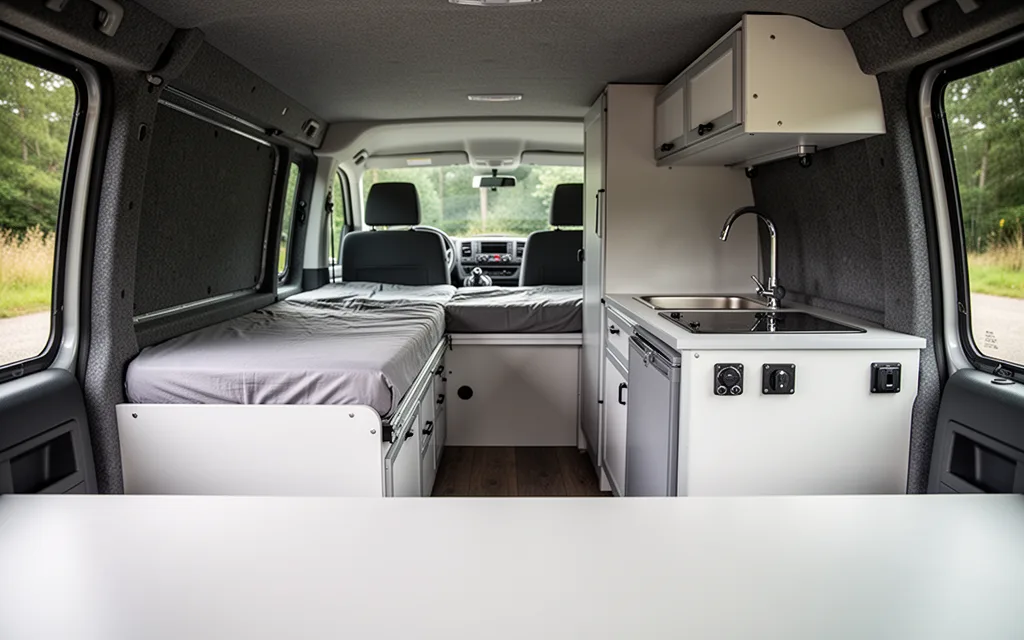
Looking to transform your van into a functional space without breaking the bank? Simple van conversion ideas can make the process accessible, even for those with limited experience or tools. Focus on essentials like maximizing storage with custom shelving, adding a lightweight sleeping area, or installing a portable power system. These simple upgrades prioritize practicality, ensuring your van remains comfortable for travel or daily use. By prioritizing key features and avoiding overcomplication, you can create a space that’s both efficient and tailored to your needs. Whether you’re a full-time traveler or a weekend adventurer, these straightforward solutions help you achieve a converted van that’s as useful as it is affordable.
DIY Storage Solutions for Minimal Effort
Maximize van space without drilling by using adhesive-backed shelving systems, which attach to walls or ceilings with strong, removable mounts. Opt for lightweight materials like bamboo or aluminum to avoid overloading your van’s structure. For vertical storage, install tension rods between the ceiling and floor to hold hanging organizers or fabric bins—these can be repositioned as needed. Collapsible bins made of polypropylene or silicone are ideal for packing gear; their nested design saves space when empty, and some models feature snap-lock closures for secure transport. Use the back of van doors by adding magnetic strips or Velcro panels to hang small items like utensils or toiletries. For under-bed storage, choose bins with non-slip bottoms that fit snugly without requiring permanent fixtures. Label bins with waterproof markers or adhesive tags for quick access during travel. Avoid bulky solutions by prioritizing modular systems that adapt to your changing needs—think stackable trays for kitchenware or foldable dividers for organizing tools. These methods keep your van clutter-free while preserving its original condition, making them perfect for short-term conversions or renters who need temporary storage fixes.
- Use 3M Command strips or similar adhesive mounts for lightweight shelves and hooks.
- Invest in collapsible bins with handles for easy transport and nesting when unused.
- Install overhead tension rods to hang lightweight storage nets or fabric pouches.
- Utilize magnetic strips on metal van surfaces to secure small tools or kitchen items.
- Choose bins with non-slip bases for under-bed or floor storage without drilling.
Budget-Friendly Furniture Upgrades
Opt for lightweight, space-efficient seating and tables designed for compact living. Look for foldable or modular options made from materials like aluminum, bamboo, or reinforced plastic—these are durable yet easy to transport. Secondhand stores, online marketplaces, and van-specific retailers often carry affordable pieces tailored for small interiors. For example, a collapsible dining table with a honeycomb core can be stored vertically when not in use, saving precious floor space. Pair it with a cushioned bench that doubles as a sleeping area, ensuring comfort without sacrificing mobility.
- Shop secondhand: Thrift stores and Facebook Marketplace frequently list used van-compatible furniture at a fraction of retail prices. Inspect for lightweight construction and minimal bulk.
- Use foldable designs: Tables with extendable surfaces or wall-mounted options (like this collapsible model) maximize utility in tight spaces.
- DIY with foam and fabric: Upgrade basic seating by adding foam padding and removable covers for hygiene and comfort. Use Velcro or elastic straps for easy storage.
- Choose multifunctional pieces: A bench with built-in storage compartments or a table that converts into a work desk can streamline your layout.
Always prioritize weight limits and ease of assembly. Lighter materials reduce strain on your van’s structure and simplify reconfigurations during travel. Test furniture in your van before purchasing to ensure it fits seamlessly with your layout.
Essential Tools for Simple Modifications
When tackling basic van conversion tasks, having the right tools can streamline your workflow and prevent costly mistakes. A Simple Van Conversion Kits for DIY Enthusiasts often includes some essentials, but you’ll need a few additional items for precision work. Start with a high-quality utility knife—ideal for cutting insulation, flooring, or sealing materials. Pair it with a set of screwdrivers (both flathead and Phillips) to handle everything from mounting brackets to securing cabinets. A measuring tape and carpenter’s square are non-negotiable for ensuring components fit correctly, while a level will keep shelves, countertops, and walls straight.
- Utility knife: For slicing foam, cutting vinyl, or trimming excess materials during insulation or flooring installation.
- Adjustable wrench and pliers: Useful for tightening bolts, gripping pipes, or adjusting hardware during plumbing or electrical upgrades.
- Measuring tape + laser measure: Accurate measurements are critical when planning layouts or installing custom storage solutions.
- Electric drill with bits: Drilling holes for mounting hardware, installing outlets, or securing heavy-duty fixtures becomes much faster with this tool.
- Multi-tool: A compact, all-in-one device for tasks like sanding, cutting, or tightening screws in tight spaces.
Investing in durable, high-quality tools ensures longevity and reduces the risk of errors during your conversion. For kits that bundle these essentials, refer to our guide on Simple Van Conversion Kits for DIY Enthusiasts to simplify your setup.
Lighting and Ventilation Hacks
Boost your van’s usability with low-effort upgrades that prioritize function over complexity. For lighting, adhesive-backed LED strips are a game-changer—they snap onto surfaces like countertops, cabinets, or ceilings without drilling or wiring. Opt for waterproof models if you’ll be off-grid, and use a dimmer switch (available in basic van conversion kit) to adjust brightness for tasks like cooking or reading. Mount strips under overhead storage bins to illuminate workspaces, or line the ceiling for a soft, ambient glow.
For ventilation, portable fans are your best bet. Ceiling-mounted USB-powered fans (like the Lasko 22” model) attach to van ceilings with minimal effort and draw in fresh air without permanent modifications. Pair them with window-mounted oscillating fans to create cross-ventilation, especially during hot days. Look for fans with adjustable airflow and remote controls for convenience.
Both upgrades cost under $50 and take minutes to install, making them ideal for van lifers who want to avoid complex wiring. Prioritize LED strips with built-in controllers for instant mood lighting, and test fan placements for optimal airflow before finalizing setups. These hacks ensure your van stays bright, cool, and functional without sacrificing simplicity.
First-Time Conversion Checklists
Begin with a detailed plan to avoid costly mistakes. Start by measuring your van’s interior and sketching a layout that prioritizes storage, comfort, and functionality. Next, address insulation: use foam board panels for walls and ceilings, apply spray foam in corners, and install a vapor barrier to prevent condensation. For flooring, choose lightweight materials like vinyl or laminate; ensure the subfloor is clean, dry, and level before installation. Electrical setup requires a dedicated breaker box, proper wiring for outlets and lighting, and grounding. Always test circuits with a multimeter before sealing panels. For beginners, cross-referencing Simple Van Conversion Ideas for Beginners can clarify material choices and budgeting. Finally, inspect all work for safety hazards—check for electrical shorts, secure insulation seams, and test door seals. Document each completed task to track progress and identify areas needing adjustment. Prioritize ventilation and fire safety by installing smoke detectors and ensuring proper airflow. This methodical approach ensures a functional, durable conversion without overwhelming complexity.
- Insulation: Measure spaces, cut foam boards to fit, seal gaps with caulk, and add a vapor barrier.
- Flooring: Clean and level the subfloor, apply adhesive, and lay materials in sections to avoid bubbles.
- Electrical: Install a breaker box near the van’s battery, run wires through conduit, and mount outlets at waist height.
- Final Checks: Test all electrical components, ensure insulation is airtight, and confirm flooring is securely fastened.
Related reading
- Simple Van Conversion Kits for DIY Enthusiasts
- basic van conversion kit
- Simple Van Conversion Ideas for Beginners
- simple camper van conversion kit
- diy van conversion kits – 5 best for first-time converters
- buy a van conversion | simple ideas for first-time buyers
- diy van conversion kits uk – simple ideas for beginners
- Van Conversion Kits UK: Simple Ideas for Converters
- camper van conversion kits

Leave a Reply