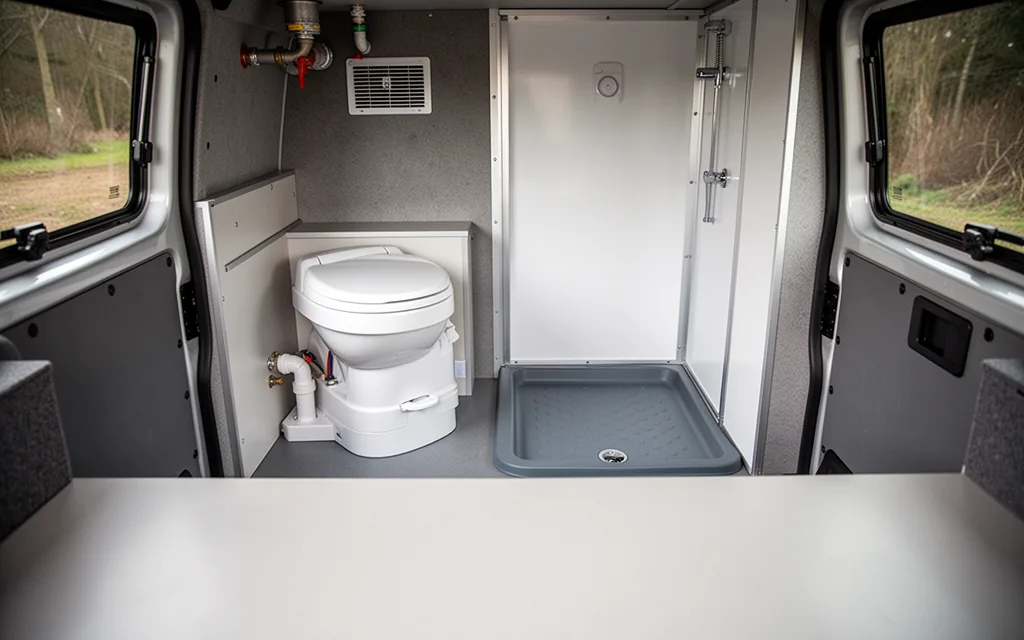
Converting a van’s bathroom into a functional space requires balancing compact design with practicality. A van’s bathroom must accommodate essentials like a toilet, sink, and shower while maximizing limited square footage. Consider space-saving fixtures, such as wall-mounted toilets or foldable shower enclosures, to optimize room. Materials like waterproof composites and lightweight metals ensure durability without adding bulk. Smart storage solutions, including under-sink cabinets or overhead compartments, help keep the area organized. Prioritize ventilation to prevent mold, and use LED lighting for energy efficiency. A well-thought-out van bathroom can transform a cramped space into a comfortable, hygienic retreat—ideal for long trips or minimalist living. Focus on simplicity, durability, and clever design to meet the unique demands of a mobile bathroom.
Optimizing Space with Compact Fixtures
In van conversions, every inch counts, and bathroom fixtures must balance functionality with minimal footprint. Wall-mounted sinks are a top choice, as they eliminate the need for bulky cabinets and free up floor space. Opt for models with narrow profiles or integrated soap dishes to maximize utility. For showers, consider foldable systems that tuck into corners or use retractable shower curtains to create a temporary enclosure. Some setups feature flexible hoses and low-profile showerheads that mount directly to the ceiling or wall, avoiding the need for permanent structures.
- Corner-mounted sinks: Install sinks in unused corners to utilize dead space, often paired with mirrored backsplashes to enhance the illusion of roominess.
- Collapsible shower trays: Choose lightweight, foldable trays that can be stored under the sink or tucked into a cabinet when not in use, paired with a handheld showerhead for flexibility.
- Over-the-toilet storage: Add a narrow shelf or cabinet above the toilet to hold toiletries, reducing clutter elsewhere. Ensure it’s waterproof and securely mounted to prevent leaks.
- Wall-hung toilets: Replace standard toilets with wall-mounted models that save floor space and allow for easier cleaning beneath the unit.
- Multi-functional vanities: Use countertops with built-in compartments for storing towels, cleaning supplies, or even a small bidet attachment to consolidate space.
Materials like stainless steel, composite, or lightweight plastics are ideal for durability and ease of installation. Always prioritize fixtures that can be disassembled or adjusted for future modifications.
Water and Waste Management Solutions
Efficient water storage in a van bathroom hinges on lightweight, durable materials like food-grade polyethylene tanks (10–20 gallons) mounted under the floor or in the rear to free up interior space. Pair this with a manual or electric pump to route water from the tank to the sink and toilet, ensuring consistent pressure without overcomplicating the system. For greywater recycling, install a gravity-fed system that channels used sink and shower water through a fine mesh filter into a secondary holding tank. This water can later be used for flushing composting toilets or cleaning, reducing freshwater consumption by up to 50% (source).
- Composting Toilets: Opt for a closed-loop model with a separator for liquids and solids, minimizing odor and eliminating the need for sewer connections. Regularly empty the compost bin into a designated outdoor area, following local regulations.
- Blackwater Tanks: Use a sealed, odor-proof tank for sewage, paired with a macerator to break down waste and reduce volume. Ensure it’s compatible with your van’s weight capacity and easy to access for emptying.
- Water Conservation: Install low-flow faucets and a dual-flush toilet to cut usage. Consider a hand-pump sink to avoid electrical dependencies.
These systems balance functionality with space constraints, ensuring hygiene and compliance with environmental standards during long-term van living.
Lighting and Ventilation Strategies
Proper lighting and ventilation are critical in van bathrooms to prevent mold and ensure usability. For lighting, opt for LED strip lights installed under van countertops or along shower walls—they provide even, glare-free illumination and are easy to retrofit. Puck lights mounted on vanity mirrors or ceilings offer focused task lighting, while recessed LED panels in ceilings or walls maximize space without adding bulk. Choose IP65-rated fixtures to withstand moisture, and use 3000K warm white bulbs for a calming ambiance or 4000K cool white for brighter, more functional spaces.
- Ventilation: Install a low-power DC exhaust fan (e.g., 12V models) to remove humidity. Pair it with a heat-resistant, waterproof duct routed to the exterior. For natural airflow, use roof vents or awning windows to create cross-ventilation. Consider dehumidifier integration if moisture is persistent, but prioritize fans for energy efficiency.
- Material choices: Use stainless steel or marine-grade aluminum for fan housings to resist corrosion. Seal grout and caulking with silicone mold-resistant compounds to block moisture ingress.
- Layout tips: Position the fan near the shower or toilet to target high-moisture zones. Use light-reflective surfaces like white tiles or mirrored panels to amplify brightness without adding heat.
When selecting ventilation components, refer to our van conversion bathroom kit guide for compatible, space-saving systems designed for van-specific constraints.
Durable Materials for Van Bathrooms
When converting a van bathroom, prioritizing waterproof, lightweight materials is critical to withstand frequent use and limited space. Stainless steel is an excellent choice for sinks, faucets, and fixtures due to its corrosion resistance and ease of cleaning—ideal for cramped, high-moisture environments. Composite countertops, made from a blend of resins and fillers, offer durability without adding excessive weight, making them perfect for van conversions where structural load matters. These surfaces resist cracking, staining, and water damage, ensuring longevity even in rough conditions. For walls and floors, consider marine-grade plywood or waterproof laminate, which are lightweight yet moisture-resistant. Always seal seams with silicone caulk to prevent leaks, and opt for molded plastic or rubber mats to absorb impact and protect surfaces.
- Stainless steel fixtures reduce maintenance and prevent rust in humid conditions.
- Composite countertops combine lightness with strength, fitting seamlessly into tiny layouts (see Van Conversion Bathroom Ideas for Tiny Spaces for space-saving tips).
- Marine-grade materials like waterproof laminate or epoxy-coated wood balance durability and weight efficiency.
- Non-slip, waterproof flooring (e.g., rubber or vinyl) ensures safety and easy cleanup.
Investing in these materials not only enhances functionality but also minimizes the risk of water damage, which is crucial in a mobile environment. Pairing them with thoughtful design—like foldable fixtures or wall-mounted storage—maximizes both practicality and comfort.
Smart Layout Planning for Van Bathrooms
Begin by measuring your van’s interior dimensions precisely, noting ceiling height, floor space, and any structural obstructions. Use a tape measure and sketch a rough floor plan to visualize how fixtures will fit. Prioritize functionality by identifying essential components: a compact toilet, a wall-mounted sink, and a foldable or corner shower. For small spaces, consider a composting toilet to save floor area—see our best van conversion toilet guide for options that balance efficiency and comfort. Next, allocate space based on usage frequency: place the sink near the entrance for convenience, and position the toilet away from high-traffic zones to ensure privacy. Use 3D modeling software or van conversion templates to experiment with layouts before committing to installations. Opt for modular fixtures, like retractable shower rods or pivoting mirrors, to maximize flexibility. Ensure proper ventilation by incorporating a small exhaust fan or window vent to prevent moisture buildup. Finally, test your layout with mock-ups or temporary fixtures to identify ergonomic issues, such as awkward reach distances or cramped movement paths. A well-planned layout balances storage, accessibility, and hygiene, turning even the tightest van interior into a functional bathroom.
Related reading
- van conversion bathroom kit
- Van Conversion Bathroom Ideas for Tiny Spaces
- best van conversion toilet
- van conversion toilet cubicle
- Van Conversion Toilet Shower Ideas for Full Bathroom Setups
- best van for camper conversion with bathroom
- camper van bathroom for sale
- best van conversion kits with bathroom
- van conversion with toilet for sale
Leave a Reply