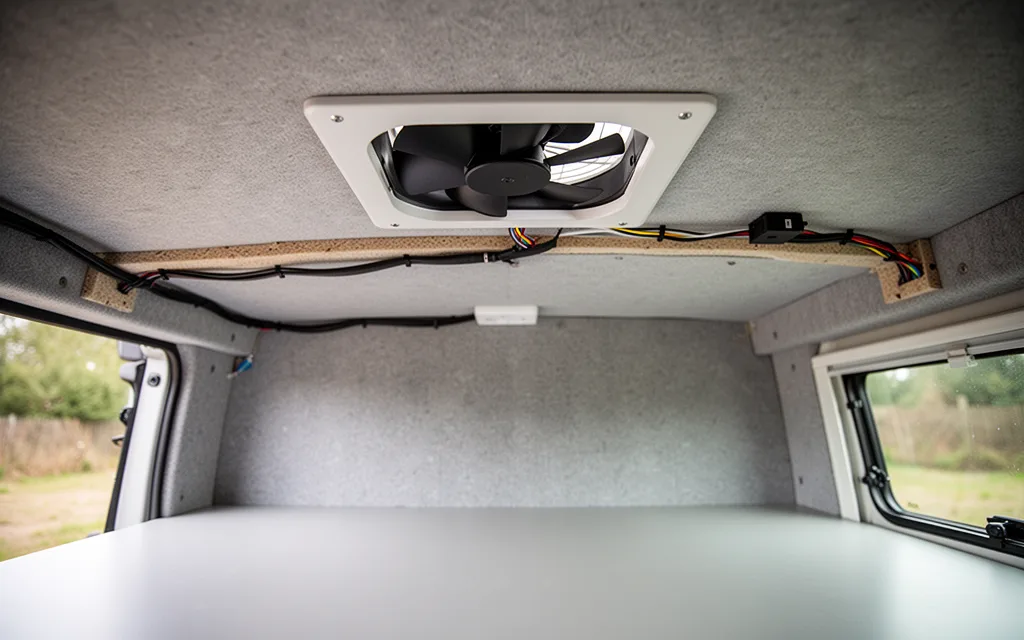
Whether you’re traversing desert highways or parked under a summer sun, managing heat inside your van is a daily challenge. Camper van cooling fans are a game-changer for van life, offering targeted airflow without draining your battery. But with so many options, how do you choose the right setup? This article breaks down five smart ideas to maximize cooling efficiency, from strategic fan placement to pairing with solar power. Whether you’re a full-time nomad or weekend adventurer, these tips will help you stay comfortable in any climate—without sacrificing space or energy. Let’s explore how to make your van a cooler, more livable space.
How Camper Van Cooling Fans Work: A Simple Guide
Camper van cooling fans operate by using an electric motor to spin blades that draw in warm air and expel it through ducting, creating a continuous airflow. Most models include thermostats or timers to automate operation, ensuring consistent cooling without manual adjustments. Unlike air conditioners, these fans don’t lower air temperature but enhance evaporation and heat dissipation by moving air across your body or through vents. This makes them ideal for van life, where power efficiency and portability are key.
- Energy efficiency: Fans use significantly less power than AC units, preserving battery life during off-grid trips.
- Thermostatic control: Built-in sensors activate fans only when temperatures exceed a set threshold, reducing unnecessary energy use.
- Strategic airflow: Ducting directs cool air to sleeping areas or kitchens, improving comfort in confined spaces.
- Reduced condensation: Circulating air prevents moisture buildup in insulation, which can cause mold in humid climates.
- Compatibility with solar systems: Low-power consumption makes them easy to integrate with solar panels or battery banks.
For van owners, these fans are a lightweight, cost-effective alternative to bulky AC units. They’re especially useful in hot climates or during long drives, where passive cooling methods like shade or ventilation fall short. Proper installation—such as sealing ducts and positioning fans near heat sources—maximizes their effectiveness. Pairing them with shade covers or reflective window films can further boost cooling efficiency without draining power reserves.
Top 5 Smart Installation Ideas for Van Cooling Fans
Installing cooling fans in your camper van requires careful planning to maximize airflow and efficiency. Start by positioning fans strategically: mount intake fans near the front of the van (e.g., under the dashboard or near vents) and exhaust fans near the roof or rear to create a pressure differential. Use a fan calculator to determine optimal placement based on your van’s dimensions. Next, secure fans with heavy-duty brackets or adhesive mounts designed for vibration resistance—avoid using duct tape, which can fail in high heat. For electrical setup, run wiring through sealed conduits to prevent moisture damage and install a relay switch to reduce strain on your battery. Always include a fuse (typically 10–20A) to protect against short circuits. If using a 12V power source, consider a dedicated battery or solar setup for uninterrupted operation during off-grid trips. Finally, insulate fan housings with foam or silicone to prevent condensation and noise. Regularly check for blockages in vents and clean filters to maintain airflow. Prioritize fans with adjustable speed settings for flexibility in different climates. These steps ensure your cooling system works efficiently without compromising your van’s structural integrity or electrical safety.
Choosing the Right Fan: AC vs. DC vs. Hybrid Options
When selecting a cooling fan for your van, the power source determines efficiency, portability, and compatibility with your setup. AC fans require a standard 120V outlet and an inverter to convert your van’s DC battery power to AC—ideal for short-term use but less efficient for long-term off-grid trips. DC fans, powered directly by your 12V battery, are more energy-efficient and quieter, making them a top choice for van life. However, they may lack the cooling capacity of AC models in extreme heat. Hybrid fans bridge the gap, offering dual power options (AC and DC) and often featuring built-in inverters for flexibility. These are best for van owners who need adaptability, such as those frequently switching between campgrounds and city stops.
- AC Fans: Best for temporary use near power sources; avoid for prolonged off-grid travel due to high energy draw.
- DC Fans: Prioritize these for battery efficiency and low noise, but pair with a thermostat for optimal performance in hot climates.
- Hybrid Fans: Ideal for versatility, but ensure the model includes a reliable inverter to prevent battery drain during extended use.
For those integrating cooling systems into a broader cool van conversion ideas project, hybrid fans can complement solar setups or battery banks without overcomplicating your electrical layout. Always calculate your power needs based on usage patterns and climate to avoid overloading your van’s electrical system.
Maximizing Cooling Efficiency with Fan Placement
Strategic fan placement can transform how your van handles heat, but it requires thoughtful planning. Start by positioning fans to create cross-ventilation: mount one near a window or vent to draw in cool air, and place another at the opposite end to push hot air out. This forces airflow through your van, reducing stagnant heat pockets. Avoid placing fans directly above sleeping areas—ceiling fans work best when angled to circulate air horizontally, not downward, to prevent discomfort during rest.
- Use ducted fans near heat sources: Mount fans near appliances like stoves, batteries, or electronics to target hotspots. Pair them with ducting to channel warm air toward vents or open windows, improving overall airflow without overworking the fan.
- Optimize ceiling fan direction: Reverse blade rotation in colder months to push warm air down from the ceiling, and switch to summer mode for upward airflow. Ensure fans are at least 18 inches from walls to avoid turbulence.
- Layer fans for zoned cooling: Use smaller fans in high-traffic areas (e.g., near a workbench) while reserving larger units for broader spaces. This prevents overcooling one area while leaving others sweltering.
- Seal gaps first: Fans work best when airflow isn’t leaking through doors, windows, or seams. Use weatherstripping or draft guards to lock in cooled air before relying on fans to move it.
For deeper insights into heat management systems, see our guide on camper van cooling options, which covers passive and active cooling solutions to pair with your fan setup.
DIY vs. Professional Installation: Pros and Cons
Choosing between DIY and professional installation for camper van cooling fans hinges on your technical skills, budget, and timeline. Both approaches have distinct trade-offs that impact long-term reliability and cost.
- DIY Pros:
- Cost savings: Skipping labor fees can save 30–50% on total expenses, ideal for budget-conscious van lifers.
- Customization control: You can tailor fan placement and wiring to your van’s unique layout, ensuring optimal airflow in tight spaces.
- Learning opportunity: Gaining hands-on experience with electrical systems may prove useful for future repairs.
- DIY Cons:
- Time investment: Proper installation requires 8–12 hours of work, including sourcing parts and troubleshooting.
- Risk of errors: Improper wiring could lead to electrical fires or void manufacturer warranties.
- Limited expertise: Without experience, you might misjudge cooling capacity or ventilation needs, leading to underperformance.
- Professional Pros:
- Guaranteed quality: Professionals ensure correct wiring, secure mounting, and compatibility with your van’s electrical system.
- Warranty coverage: Many installers offer labor warranties, protecting against defects or failures post-installation.
- Time efficiency: A professional can complete installation in 2–4 hours, freeing you to focus on other van upgrades.
- Professional Cons:
- Higher upfront cost: Labor fees add $200–$500 to the project, depending on location and installer reputation.
- Less customization: Installers may prioritize standard solutions over niche configurations, limiting airflow optimization.
Leave a Reply