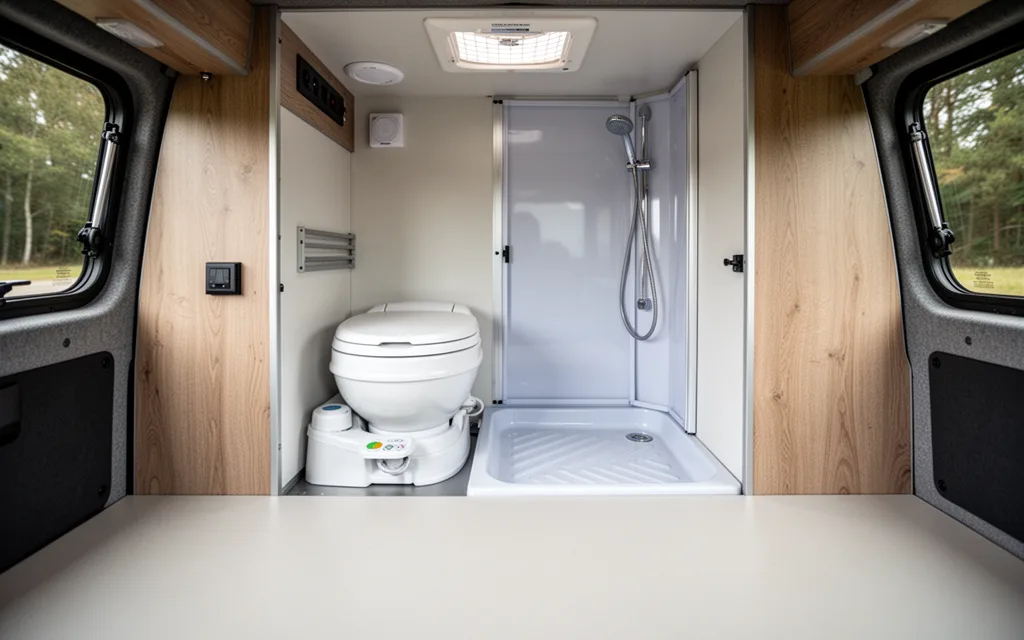
Van conversion hobbyists know that every square inch counts when designing a functional bathroom for tiny spaces. Van conversion bathroom ideas must balance practicality with ingenuity, leveraging foldable fixtures, wall-mounted sinks, and composting toilets to save room. Consider lightweight materials like marine-grade composites for durability, and integrate hidden storage beneath seats or within van walls. Prioritize ventilation with compact fans and moisture-resistant finishes to prevent mold. Smart layouts—like pivoting mirrors or retractable shower curtains—maximize usability without clutter. These strategies transform cramped quarters into efficient, comfortable sanctuaries, proving that even the smallest van can host a surprisingly spacious bathroom with the right planning.
Space-Saving Fixtures for Compact Van Bathrooms
Maximizing functionality in a van bathroom hinges on fixtures that blend innovation with minimalism. Wall-mounted toilets, for instance, eliminate the need for bulky tanks and free up floor space for movement. Opt for models with a macerating pump system to simplify waste disposal without requiring a traditional sewer connection. Pair this with a foldable sink unit—many designs feature a counter that swings down from the wall, revealing a basin and faucet when needed. Look for sinks made from lightweight, corrosion-resistant materials like stainless steel or composite polymers to withstand frequent use without adding unnecessary weight.
- Foldable shower systems: Install a shower curtain with a built-in drain and a collapsible frame that tucks into a corner. Some setups include a handheld showerhead stored in a wall-mounted caddy, reducing clutter when not in use.
- Vertical storage: Mount shallow cabinets or shelves above the toilet or along shower walls. These can house toiletries, towels, and cleaning supplies, keeping essentials within reach without encroaching on floor space.
- Multi-functional hardware: Choose faucets with pull-down sprays that double as showerheads, and consider toilet paper holders integrated into the wall to avoid standalone fixtures.
- Compact mirrors: Use a mirror with built-in LED lighting and a hidden compartment for storing small items like razors or skincare products.
Each fixture should prioritize accessibility, durability, and ease of installation in a mobile environment. Prioritize modular designs that can be adjusted or removed during travel to maintain flexibility in your van’s layout.
DIY Tips for Building a Van Conversion Bathroom
Start by sketching a layout that maximizes vertical space and integrates with your van’s existing structure. Use a compact, wall-mounted sink with a pull-down faucet to save floor room, and opt for a composting toilet or a portable, gravity-fed system to avoid complex plumbing. For water supply, install a freshwater tank with a pump and route hoses through sealed, insulated channels to prevent leaks. Always test for leaks before sealing components permanently.
- Material selection: Choose lightweight, durable materials like marine-grade plywood for walls, stainless steel for fixtures, and silicone sealant for joints. Avoid particleboard, which absorbs moisture and weakens over time.
- Plumbing hacks: Use flexible, braided stainless-steel hoses for connections and install a grey water tank beneath the van to collect wastewater. For a composting toilet, follow PM’s guide on low-maintenance systems to ensure proper waste management without sewage lines.
- Mounting: Secure all fixtures with brackets and epoxy to prevent movement during travel. Use a shower caddy or collapsible showerhead to minimize water usage and simplify cleanup.
- Ventilation: Install a small, low-power exhaust fan and line walls with moisture-resistant panels to prevent mold. Consider a window vent for additional airflow during showers.
- Testing: Before sealing the bathroom, run water through all pipes, check for drips, and simulate toilet use to identify stress points. Adjust brackets or seals as needed.
Water-Efficient Solutions for Van Living
Conserving water in a van conversion bathroom requires smart choices that balance functionality with resourcefulness. Start with van conversion bathroom ideas that prioritize low-flow fixtures, such as aerated faucets and showerheads with flow restrictors. These reduce water use by up to 50% without sacrificing pressure, making them ideal for daily tasks like handwashing or quick showers. For toilets, consider composting models that eliminate the need for water entirely, pairing with a separate greywater system for rinsing.
- Greywater recycling: Install a simple bucket system to collect water from sinks or showers. Filter it through a biodegradable soap-compatible mesh, then reuse it for flushing composting toilets or watering plants. Avoid using detergents to prevent clogging.
- Waterless urinals: These use a small amount of odor-neutralizing gel, drastically cutting water consumption compared to traditional systems.
- Condensation capture: Use a shower curtain with a built-in water collection pouch to repurpose steam and drips, especially useful in cold climates.
- Low-flow bidets: Opt for models with adjustable spray settings and automatic shut-off to minimize water waste during use.
These strategies not only reduce water dependency but also lower the environmental impact of your mobile lifestyle. Prioritize systems that are easy to maintain and compatible with your van’s layout, ensuring long-term practicality.
痓
Lighting and Ventilation Strategies for Van Bathrooms
Maximize brightness and airflow in your van bathroom by prioritizing LED lighting and compact ventilation solutions. LED strips mounted under van cabinets or along the ceiling provide even, low-profile illumination without consuming valuable space. Opt for warm-white LEDs (2700K–3000K) to create a spa-like ambiance, or use cooler tones (4000K) for task lighting near the sink. Motion-sensor or dimmable options conserve power and add convenience during late-night use. For ventilation, install a low-profile, high-velocity exhaust fan (e.g., 2-inch diameter models) near the shower or toilet area. These units, often rated for 50–100 CFM, effectively remove moisture while minimizing noise. Pair them with a window-mounted vent or a small roof vent for cross-flow airflow, especially during travel. If space is tight, consider a fan with a built-in light to double as a functional fixture.
- LED placement: Use adhesive-backed strips under vanetry cabinets or along the ceiling for seamless lighting.
- Exhaust fan size: Choose a 2-inch fan with a 50–100 CFM rating for compact, efficient ventilation.
- Hybrid solutions: Combine a fan with a window vent for passive airflow when parked.
- Energy efficiency: Select LED strips with motion sensors or dimmers to reduce power draw.
For pre-assembled components, check out our van conversion bathroom kit, which includes compatible LED lighting and ventilation options designed for van-specific constraints. Prioritize materials that resist moisture and corrosion, ensuring your setup remains functional for years.
Material Choices for Durable and Easy-to-Clean Van Bathrooms
When selecting materials for a van bathroom, prioritize options that balance durability, weight, and resistance to moisture. Marine-grade composites, such as fiberglass-reinforced plastic (FRP) or PVC, are excellent choices. These materials are inherently waterproof, resist mold and mildew, and can withstand temperature fluctuations common in van environments. FRP, in particular, is lightweight and can be molded into custom shapes to fit irregular spaces, though seams must be sealed with marine-grade silicone to prevent leaks. PVC panels are another option, offering easy installation and maintenance with minimal warping over time.
- Stainless steel is a top contender for fixtures like sinks and faucets. 304-grade stainless steel resists corrosion and is easy to clean with non-abrasive wipes. However, it’s heavier than composites, which may impact van weight distribution and fuel efficiency. Opt for brushed finishes to minimize fingerprint visibility.
- Aluminum alloys, particularly those with anodized coatings, provide a lightweight alternative to stainless steel. They’re corrosion-resistant but can dent easily, making them less ideal for high-traffic areas like van bathrooms.
- Engineered quartz or laminate countertops with waterproof backing are viable for small van bathrooms. These materials are durable and stain-resistant but require careful sealing around edges to prevent water seepage.
For flooring, consider non-slip rubber mats or vinyl tiles with waterproof backing. Avoid wood or untreated metal, which can warp or rust. Always test materials for compatibility with van-specific conditions, such as frequent temperature shifts and limited ventilation.
Leave a Reply